You are currently viewing DIY Craft Foreign Currency Display

DIY Craft Foreign Currency Display

left over foreign currency

If you are anything like me, you might find yourself carrying around some extra left over foreign currency cash when you return from your travels. Sometimes it is enough to convert back to US dollars and sometimes you hang onto it for plans to return back to that country. Sometimes it is more of the hassle of the exchange for the few bills you have remaining. But I consider it almost like a souvenir of where I have been. I decided it would really cool to display some of these incredible foreign bills but wasn’t sure of way to do it without it being like a museum or really tacky, so I came up with this project. I hope you enjoy! Feel free to copy with your own travels! 

what you will need

  • Poster board
  • Ruler 
  • Exacto knife
  • Scissors
  • Letter stencils
  • Bill money from your travels 
  • Tape 
  • Frame 
  • Paint (optional)

step by step instructions

Planning and Measuring

Decide how many countries you want on your poster and measure how large your stencil letters are. You can calculate out how many will fit and then with any extra inches make that the border above and below. Once you have the measurements with using a ruler make lines on the back of your poster for each country. In my project I used a 28 x 22 poster board and did 9 countries. From the top I measured 3 1/16 inch space for each country which left me with a 9/16 inch border on the bottom. The stencil letter size I used was 2 inch letters.

Stencil the Country Names

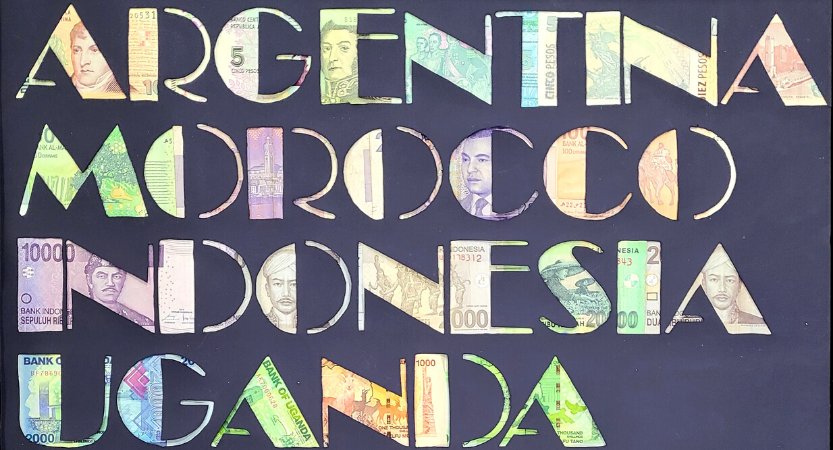
After having the measurements and lines set, I began to stencil my countries. I did this on the back with the letters backwards. You can hold the poster up to a window to make sure they are all in the correct orientation after doing the stencil. To make it more pleasing to the eye, I did longer and shorter length countries varying down the poster. You could also opt to go small to large or vice versa if you prefer as well. I also looked at the color of the bills for each country before choosing the order, so I did not have all the brightly colored bills in one area. Once again, you can decide these things completely up to your aesthetic. 
 

Cut the stencil out

Once the letters were all stenciled, I began to cut the letters out. This was slightly tedious. I would start with the Exacto knife to get it started and where I could would use scissors which were a little faster. I would use the knife over cardboard to not cut the surface below the poster. If you do this carefully you can also end up with perfect letter stencils that you can use for another project if desired. 
 

Paint the poster (optional)

For me I thought the poster needed some color after I cut out the letters, so I opted to paint it. The color theme of the room where I was going to put them was navy blue so that is the color I used but once again choose to your liking. This is an optional step as you can stay with plain white. Another option is to purchase a colored poster board.
 

align the currency in the stencil

Next I meticulously folded and moved around the bills beneath the cut out letters of their corresponding country. I would do this to see if face, animal or building on the bill could fit in cut out. Honestly, I am super type A and the project would still be very cool if you just tape the bills in but I wanted to showcase the cool and unique features  of the bill, so I spent some time on this. I did not cut or destroy any of the bills in this project. 
 

tape the currency

Once the bills were in the positions I liked, using painter tape I taped each one down. I would flip the cardboard over to ensure I had good placement and if needed would make adjustments. I would fold the extra bills to be sure they were not overlapping into another country’s letters. I did this down the line for each country until all the stencil letters were filled. 
 

Frame, hang and enjoy

Lastly, I framed the poster and hung it. Because I had so much currency I did two of these projects. It was significantly faster the second time around. It’s a great way to display the countries you’ve been to and the awesome differences in currency from around the world.