
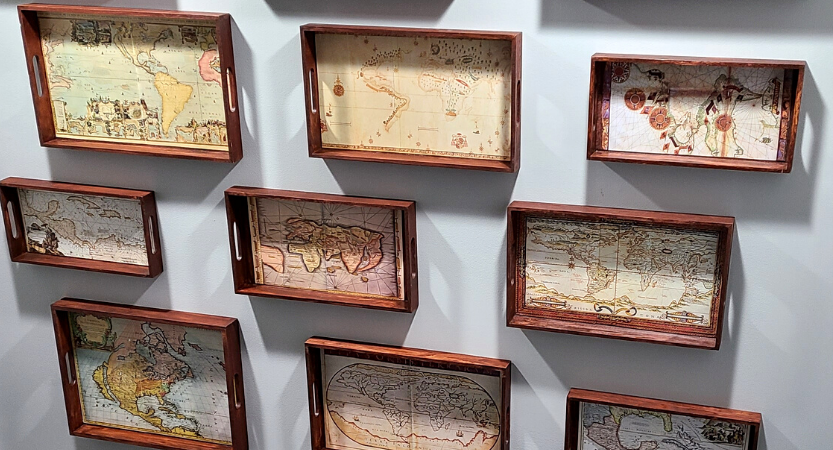
vintage map trays
Trays are great for decorations, centerpieces or useful for carrying objects and these trays will be sure to grab your attention. You can jazz up an old tray you have already or make a bunch and use them as centerpieces at an event. Once used as centerpieces Trust me you will love these.
items you need
- Plain wooden trays
- Wood stain- color of your choice
- Old rag
- Old Atlas or book of maps
- Mod Podge
- Scissors
- Water protective polyurethane
step by step instructions
Find Awesome Maps
One of the best travel decorations include maps on it. One of the best places to get cheap travel maps is at your local bookstore or thrift store. These books are often pretty cheap and you find incredible old atlases and maps. Some places also have old road maps that work equally as well. We found this edition of copied old maps from history. It was not actually the old maps themselves so it feels less sad tearing up a book.
cut the maps
First, measure the dimensions of your wooden trays so you can see which maps may be appropriate to fit into the trays. You can also cut the maps and then scale them down to fit. Make sure they are not too big for the space. If they are too large, when you go to glue them there will be air bubbles. Thus, it is better to go slightly smaller than larger.
Stain the wood trays
I purchased some from Michael’s craft store and bought some nesting ones from Amazon. This ended up being a good way to do it because it gave us a bunch of different sizes. You can pick whichever color of stain you would like. The best way to attach stain is to paint it on and then have a rag/old shirt to wipe away the excess stain. I recommend letting the stain fully dry before attaching the maps. To save on stain you do not need to stain the inside part of the tray as this will be covered by your maps. You should stain in a well ventilated area or outside.
Mod Podge the maps into the trays
After the trays are completely stained and dry and the maps are fitted to size, you can begin gluing them down to the inside part of the tray. Put glue on the backs of the map and then do another layer over the maps. The glue will dry clear. Make sure to smooth out any air bubbles and then let dry.
make the trays water resistant
If using as actual serving tray rather than just decoration, I would strongly recommend doing a final coat with polyurethane to make it water resistant. I did not do this step as my plan was for pure decoration.
use or display your trays
We have used these trays both as centerpiece decorations but also they work wonderfully as wall art. To hang them on the walls you can either attach a backing and put nail in wall or did as we did with command strips. We created this design on our stairway landing and it is a statement piece.

